Autonomous flight is one of the miracles, that have been made possible only by modern technology.
And Ardupilot community was one of the pioneers in this field.
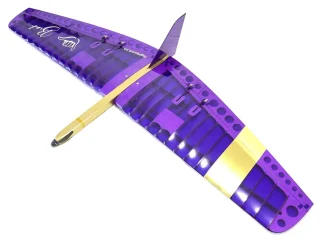
The current development went quite far to introduce Autonomous Soaring, which we will try with a modified Lull DLG glider.
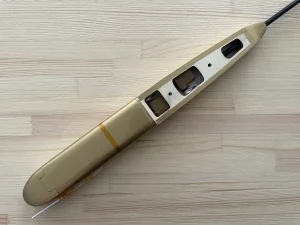
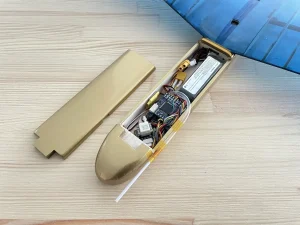
The biggest challenge is to pack all the required electronic components into a tiny fuselage, considering the CG position and the minimum possible weight.
So, we ended up with the following list of components:
- The Lull 1200mm DLG kit
- Matek F405 WMN flight controller
- Foxeer M10Q 250 GPS module with 5883 Compass
- Matek ASPD-4525 Airspeed Sensor
- Foxeer ELRS Lite 2.4G Receiver
- Tattu 550mAh 2S R-Line Lipo
- 2x Micro Servos
As you may have noticed, no motor is included.
So, we will have no pulling power by all means.
But we set the challenges to complete them 😉
Also, there will be no dedicated telemetry module.
The only feedback that we’ll have from the vehicle will be a Yaapu Telemetry script running through the ExpressLRS link.
More than enough for this project.
At the same time, the teeny-tiny F405 WMN has an onboard flash drive that will record logs for further flight analysis.
So looks like we are all set, and let’s go straight to the build.
Lull DLG Kit Modifications
As you can imagine the Lull DLG is not designed to carry all the electronics aimed for autonomous soaring…
So, in an attempt to fill all the guts in, the servos moved into the space under the wing.
GPS module takes a place in the ballast enclosure in the front rounding, which was opened to fit the Foxeer MQ250 module before assembly.
The Flight Controller, Rx, airspeed sensor board, and, the battery took their places in the pod with easy access.
The USB dongle was detached from the FC since it’s not needed in flight and is connected only for programming.
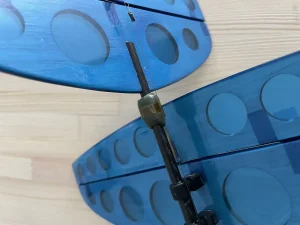
The rest of the kit stays untouched.
This all takes the AUW to 215g compared to 170g of a classic DLG setup.
That includes a ballast on the tail for the correct CG.
Not the lightest one, but we have quite some wing area to keep this weight aloft.
Radio Setup
Considering your choice of the radio and telemetry link, you can get creative here.
In our case, we’ll use:
- OpenTX radio
- ExpressLRS Tx & Rx
- Yaapu Telemetry LUA script for live Head-Up Display on the radio
Your ELRS link should be running a 100Hz Packet Rate and 1/4 Telemetry Ratio.
The above will give you plenty of range for Line-Of-Sight flights and a proper amount of telemetry packets to keep a Yaapu Dashboard on your radio alive.
The first four channels should have the stick inputs.
Channel 5 should run your Arm/Disarm switch and Channel 6 – your Flight Modes switch.
All the rest are optional, depending on your needs.
Also, add the Yaapu Telemetry script to the SD card of your radio.
Then, to enable it, go to the Telemetry screen in your radio Model Setup menu.
Open Screen1 options and set it to Script.
Then, in the next menu, choose your Yaapu script to run.
That will make it for this stage, but that’s not fully completed yet.
Ardupilot Parameters
Part 1. The Essentials
Before installing your Flight Controller into the fuselage, it’s recommended to flash it with the desired version of the Arduplane and calibrate the accelerometer.
It’s way easier to do on the table than spinning your entire model when the FC is installed.
We will be using Arduplane 4.5.7 here.
[Download this exact model parameter dump] – TBA
Then, set up a few parameters in Arduplane that will define your radio link and Yaapu telemetry passthrough connections.
Also, specify the channels that will serve as your Arm/Disarm, and Flight Modes switching.
SEIAL6_FUNCTION = 23 (for ELRS/Crossfire)
BRD_ALT_CONFIG = 1
SOARING_ENABLE = 1
RC_OPTIONS = 800 (for Yaapu Lua Stript to work properly)
RC5_OPTIONS = 153 (Arm/Disarm)
RC6_Options = *Flight mode channel*
Arm-switch on channel #5 is a requirement of the ExpressLRS system.
The software monitors the value of CH5 and enables the full potential of the radio link only when it is High.
In addition, Arduplane also operates differently when Armed or Disarmed.
So regardless of our vehicle not having a motor, Arming before takeoff will be favorable.
Once these parameters are loaded to the FC, reboot it to apply the changes.
Then, calibrate the accelerometer and perform your radio calibration as described in the Ardupilot docs.
As a result, you should see the values of your radio channels in the Arduplane.
That will make it for the initial setup.
Part 2. Set Up The Peripherals
Next, we’ll need to set up the parameters, specific to our model.
The Lull features Rudder & Elevator control only, and the Arduplane has a parameter that tells the autopilot what controls it can operate, named RUDDER_ONLY.
There are also some additional parameters that we’ll set along with that.
Also, we need to identify the parameters for all peripherals connected to the Flight Controller:
- Rudder Servo
- Elevator Servo
- GPS & Magnetometer
- Airspeed Sensor
*work in progress*

SERVO3 =
SERVO5 =
RUDDER_ONLY = 1
Aileron to Rudder mix = 100%
Part 3. Yaapu Telemetry Dashboard
To be continued…